Tuesday, December 20, 2011

Baked Acorn Squash Recipe

Buttery acorn squashYou'll love this recipe for fall and winter. It's a very easy recipe which everyone will love. The Acorn Squash is baked with butter, brown sugar and maple syrup: it's sweet and buttery. You can follow the exact same steps with a butternut squash. Yummy!

Serves 2
Preparation time: 10 minutes
Baking time: 1 hour
Difficulty: *

Ingredients:
- 1 acorn squash
- 1 tablespoon butter
- 1 tablespoon brown sugar
- 1 tablespoon maple syrup
- salt and fresh ground pepper

1. Preheat your oven at 400°F / 200°C.

2. Cut the squash into half, scoop out the seeds (you can toast them! See Recipe).

3. Melt the butter in your microwave, then add the sugar and the syrup to the butter. Add some salt and freshly ground pepper.

4. Stir well the butter mixture and brush it on the inside of the squash as well as on the cut edges.

5. Place the halves on a baking sheet, cut side up. Bake in the preheated oven for about 1 hour until the squash is tender when pierced with a knife or fork. Serve 1 half per person.

Enjoy!
Sunday, December 11, 2011

How to make Toasted Pumkin seeds

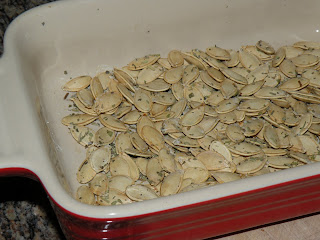
Toasted Pumpkin Seeds

When baking a pumpkin, make sure you keep the seeds to toast them. Toasted Pumpkin Seeds make a very healthy snack, full of fibers. It's preferable to use organic pumpkins or squash for this.
Try it, it's very easy!

Seeds of 1 pumpkin
Preparation time: 5 minutes
Baking time: 8 to 10 minutes
Difficulty: *

Ingredients:
- seeds of 1 pumpkin or squash
- 1 tablespoon olive oil
- species: salt & pepper / paprika / dried herbs / chili powder...

1. Preheat your oven at 375°F / 280°C

2. Place the seeds in a bowl and toss with the olive oil and spices of your choice. It's good to always add a bit of salt if you don't go for the "salt & pepper only" seeds.

3. Spread the seeds evenly on a baking sheet. Bake for 8 to 10 minutes, stirring once. Make sure the seeds brown very slightly but not too much because they would taste like burning.

Let the seeds cool and store them in an airtight container.

Thursday, October 27, 2011

Classic Chocolate Cake Recipe

Chocolate cake
This recipe is a classic. A Chocolate Cake is easy to prepare and it will make everyone happy in your household. I usually double the quantities below to make a bigger cake that will last a bit longer (2-3 days...only)! Enjoy it warm with vanilla ice cream.

Serves 6
Preparation time: 20 minutes
Baking time: 45-50 minutes
Difficulty: *

Ingredients:
- 75 g (2/3 cups) flour
- 150g butter (about 1 1/2 sticks)
- 150g (5 1/2 oz) chocolate
- 3 eggs
- 150g (2/3 cups) granulated sugar
- 1 teaspoon vanilla extract
- 1 teaspoon baking powder
- pinch of salt

1. Preheat your oven at 150°C (300°F). Grease and flour a 8-inch baking pan.

2. Melt the chocolate in a heavy bottom pan. Once melted, remove from the heat and add the butter cut into small pieces.

3. Whisk the egg yolks with the sugar and vanilla extract until the preparation whitens.

4. Pour the sugar and egg yolks preparation into the melted chocolate. Add the flour and mix well.

5. Add a pinch of salt to the egg whites. Beat the egg whites with an electric mixer at medium speed until they hold soft peaks.
Very gently incorporate the beaten egg whites to the chocolate preparation.

6. Pour the preparation into the mold and bake for 45 to 50 minutes. To test if the cake is done, insert a metal skewer or sharp knife into the centre of a muffin. It should come out dry.

Enjoy!

Monday, October 10, 2011

Super Easy Recipe for Lemon Soufflé

Lemon Soufflé
This recipe is super simple to make and you will be able to put on a show for your guests :) Light, fluffy, the Lemon Soufflé is the perfect dessert after a great family meal. The only trick is to prepare it right on time and serve it immediately because it can go down quickly.


Serves 4
Preparation time: 15 minutes
Baking time: 15 minutes
Difficulty: **

Ingredients:
- 80g granulated sugar (20g + 50g + 10g)
- 3 organic lemons
- 3 eggs
- pinch of salt

1. Place 4 ramekins in the fridge. After about 15-20 minutes, coat the ramekins with butter and sprinkle 20g of the granulated sugar all over the inside. All the sides should be covered.

2. Preheat your oven at 350°F/180°C.

3. Separate whites from egg yolks. Mix the egg yolks with 50g of granulated sugar. Add the zest of 2 lemons and mix well.

4. Beat the egg whites with a pinch of salt until peaks form. Continue beating and slowly add 10g of sugar and the juice of 1 lemon.

5. Slowly fold in the beaten egg whites into the egg yolk mixture. Pour it into the ramekins.

6. Bake for about 15 minutes or until the soufflés are fluffy and golden on top.

7. Sprinkle each soufflé with confectioner's sugar and serve immediately.

Amazingly light and delicious...!

Saturday, July 16, 2011

Home to make Plum-Vanilla Jam

Vanilla Plum Jam
I am lucky to have a plum tree in my garden so it's easy to make Plum Jam in this season. But you can also buy the fruits of course and make this jam the exact same way. I use red plums, ripe and sweet. The good thing with jam is that you can prepare several jars and eat it all year long! And my secret to get natural pectin is... lemon pips!

For about 4 jars
Preparation time: 20 minutes
Baking time: about 2 hours
Difficulty: **

Special utensil: empty spice bag/tea bag or gauze for cooking

Ingredients
- a bit more than 2 pounds red plums (use 1kg)
- 1 pound (use 500g) caster sugar
- lemon pips (from one lemon)
- 1 whole vanilla bean

1. Pit the plums and weight the pitted fruits. You should have about 2 pounds.
2. The quantity of sugar should be twice less than the quantity of plums. So if you have 2 pounds of fruits, you should use 1 pound of sugar.
3. Slice your lemon to get all the pips from it. Put them into the spice bag and close the bag securely.
4. In a big stainless steel pan, mix the pitted plums and the sugar. Add the bag containing the lemon pips.
5. With a knife, halve the vanilla beans lengthwise. Scrape the seeds into the fruit mixture and add the whole bean (optional).
6. Heat your pan on medium heat until it starts boiling. Then lower the heat and let cool slowly for about 2 hours. Mix frequently to prevent sticking.
7. To test if the jam is ready, use the spoon test: Dip a spoon into the hot jam and let the liquid drip off on a cold plate. The drops should be thick and not liquid. That's when your jam is ready!
8. Pour your jam in the jars, and return each jar upside down. Let cool like this and only return the jar when the jam is completely cool.

Enjoy right away, if you are patient, in a few days!!